How to Connect to FTP Using Core FTP LE
Core FTP LE is a secure, lightweight Windows application used to upload, download, and manage your website files. This guide will walk you through downloading Core FTP and configuring it to connect to your hosting server.
- Visit the official Core FTP website.
- Download and install the free Core FTP LE version for Windows.
- Open the application on your computer.
Step 2: Configure Your Connection Profile
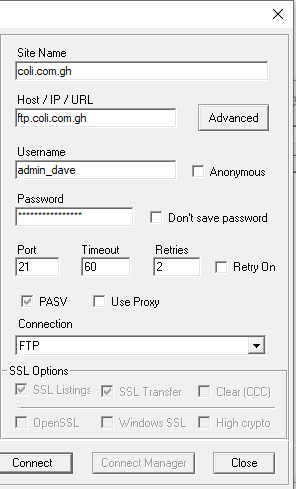
When you launch Core FTP for the first time, the Site Manager window will open automatically. If it does not, click Sites > Site Manager from the top menu.
Fill in the fields using the credentials provided in your hosting welcome email:
- Site Name: Enter a recognizable name (e.g.,
My Website).
- Host / IP / URL: Enter your domain name (e.g.,
yourdomain.com) or your server's IP address.
- Username: Enter your full FTP username.
- Password: Enter your FTP password.
- Port: Leave this as
21 for standard secure connections.
- Connection: Select FTPS (Auth TLS) from the dropdown menu. This ensures your login details and file transfers are encrypted safely.
Step 3: Connecting and Transferring Files
- After entering your details, click the Connect button at the bottom of the Site Manager window.
- If a popup appears asking you to accept an SSL certificate, click Always Accept or Yes.
- Once connected, the screen will split into two halves:
- Left Window (Local): Displays files currently on your local computer.
- Right Window (Remote): Displays files live on your hosting server.
- To upload your website files, navigate to your local files on the left, select them, and drag them into the public_html folder on the right side.
Troubleshooting Connection Failures
- Error: Can't establish connection / Timeout
- Check the PASV (Passive Mode) checkbox in your Core FTP Site Manager. Many modern server firewalls require passive mode to successfully list files.
- Error: 530 Login Authentication Failed
- Re-type your password carefully to ensure there are no trailing spaces. If your site uses a panel like CyberPanel, remember that the username must include the automatically generated suffix (e.g.,
user_domain).
- The connection drops during large transfers
- In the top menu, go to View > Options > Connections. Increase the Timeout value from 60 seconds to
120 seconds.
Thank you for your feedback.
Sorry about that :( We'll work to make it better.
You voted before.
(263 times viewed / 1 people found it helpful)
 Copyright © 2026 All Rights Reserved